Thursday, July 26, 2012
Strawberry Vanilla Yogurt Pops
When the August edition of Canadian Living arrived a few weeks ago, I think I may have let out what some people may consider a squeal of excitement when I saw that the cover photo feature was on "Light & Fruity Ice Pops." Next I probably sent Jo a text asking her if she had seen the magazine yet - something that seems to go on between us just about every month when the new Canadian Living comes out. I was excited to make my own popsicles because it is such an easy, refreshing treat for the summer. Also you can make pops that are quite healthy - and it's a lot cheaper to make your own than to buy a box of the fat free, yogurt based ones at the grocery store.
I have fond memories of eating homemade popsicles as a child - although I'm fairly certain that those were just made of frozen orange juice. Remember how great it was to suck out all the flavour and sweetness? Then you'd be left with a watery orange tasting block of ice that normally ended up in the garbage...
Since I guess that was quite a few years ago though, we no longer had the popsicle moulds, so I had to set out on a mission to find some before I could get to testing out one of the recipes from the magazine. I tried William Sonoma first - and rather than selling popsicle moulds, they carry a product called the "Zoku Quick Pop Maker." From what I gather, it is your own personal freezer that makes up to nine popsicles in a mere seven (7) minutes! The downside of this marvellous invention: the cost. It sells for about $75 Canadian for this size, and even the smaller sized one that makes six popsicles costs $55. So if buying your own Quick Pop Maker isn't in your price range, or maybe you just don't quite feel committed enough to making your own popsicles yet, there are other cheaper options for moulds. I bought a popsicle mould at Kitchen Stuff Plus for $3.99 that makes 4 pops. Sure, it looks a bit juvenile - but it makes popsicles just fine!
I halved the original recipe and made a few other changes - such as cutting down on the honey and using cranberry cocktail, which I already had in the fridge, rather than going out to buy pure cranberry juice.
The Recipe:
1 cup hulled strawberries
3 tbsp cranberry juice
3 heaping tsp liquid honey
3/4 cup plain yogurt (I used a mixture of 0% Greek yogurt and 0% plain yogurt)
1 tsp pure vanilla extract
1. In a blender or food processor, puree together the strawberries, cranberry juice and 1 tsp of honey. Strain strawberry mixture through a sieve into a bowl.
2. In a separate bowl, whisk together yogurt, vanilla and remaining honey.
3. Pour strawberry mixture into yogurt mixture and stir together. Spoon into moulds.
4. Freeze until firm, about 3 hours.
The original recipe did not call for mixing the strawberry and yogurt mixture together, but rather layering the 2 into the moulds. I thought the popsicles would taste better with the strawberry and yogurt together for a consistent taste throughout. I did follow the part of the recipe that said to strain the strawberry mixture through a sieve, but I think this was a bit unnecessary - strawberries seeds have to be just about the least offensive seed of a fruit, and I really wouldn't mind them in my ice pop. Raspberry seeds are a completely different story though...
These ice pops taste like exactly what they are: strawberries, yogurt, vanilla, honey, etc. all frozen together. If for some reason strawberries don't appeal to you, or you decide to make these a bit later in the summer when other fruit is in season, try them with raspberries or blueberries or peaches - or try mixing a combination of any of the above.
Happy Freezing...?! Or... happy popsicle making?
...Happy Eating!
Caroline
Monday, July 16, 2012
Cream Tea
When I was in England I had many interesting experiences - although the one that comes to mind now is not a description of one of the delicious teas I went for, but instead my attempt at baking. I decided to make a batch of shortbread toblerone one day, because they're straightforward and don't require too many ingredients. The cookies did turn out delicious in the end - but from baking in Celsius, to trying to figure out which type of flour to buy at Sainsbury's (there were at least 5 different types and I wasn't too sure about, for example, the difference between self-raising flour or plain flour, but I had a good idea that I didn't want either bread flour or cake flour) the experience was a bit more complicated than when I bake at home.
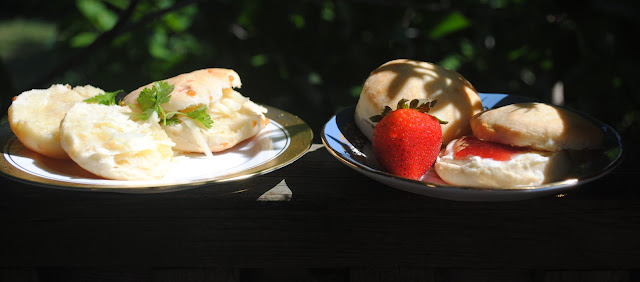
When Jo and I made scones for our Cream Tea, we had a sort of reverse of this experience. In London, at one of my visits to Fortnum and Mason, the famous tea shop, I bought a beautiful little book called Tea at Fortnum and Mason. As you may have guessed, this book is full of delightful tea recipes. This cookbook uses weight instead of volume for measurements (for example, 250 grams of self-raising flour. As in the kind of flour I didn't buy when I baked cookies in London). Luckily we were able to put our brains together (and find an online converter) to switch these scone recipes into more familiar measurements. A scale would work as well - but unfortunately we didn't have one on hand. On that note, it's only six months until my birthday if you're wondering what to get me...
Cream Tea is tea taken with scones, clotted cream and jam. Really brilliant, actually. It's not as easy to find clotted cream in Toronto as in I'm going to guess it is anywhere in England - but my local Loblaws does carry a brand called English Double Devon Cream. Not quite as delicious as the clotted cream in England, but a worthwhile substitute if you're interested in trying it here in Canada.
We made both sweet and savoury scones for our Cream Tea. The process for both is similar, so we were able to start the dough in two separate bowls but work through the steps at just about the same time.
Scones
85 g of chilled, unsalted butter, cubed = just over 1/3 cup, or 6 tablespoons
250 g self-raising flour, sifted, plus extra to dust = 2 cups
1 tsp baking powder
3 tbsp golden caster sugar
150 ml buttermilk
1 medium egg
A little milk
Clotted cream and strawberry jam, to serve
1. Preheat oven to 425 F or 220 C. Line a baking tray with parchment paper.
2. In a large bowl, rub the butter into the flour until the mixture resembles breadcrumbs. Stir in the baking powder and sugar.
3. In a separate bowl or large measuring glass, beat together the buttermilk and egg. Next, make a well in the centre of the flour mixture and use a knife to stir all the ingredients together to make a soft dough.
4. Tip out the dough and lightly knead it on a floured board and then roll it out to a 2.5 cm thickness. Stamp out rounds using a 5 cm cutter (a water glass works well for this if you don't have a cutter) and transfer the scones to the baking tray. Brush the tops with milk.
5. Bake in oven for about 15 minutes until well risen and golden. Cool until warm on a wire rack. Serve with clotted cream and jam.
Cheddar Scones
40 g of chilled, unsalted butter, cubed = just under 1/4 of a cup, or just about 3 tbsp
275 g self-raising flour, sifted, plus extra to dust = 2 cups and 3 heaping tbsp
1 tsp baking powder
75 g Cheddar Cheese, grated = 3/4 cup
200 ml buttermilk
1 medium egg
1 tsp Hot English Mustard (we used Keen's Mustard Powder)
Pinch of salt
A little milk
Butter and grated cheese to serve
1. Preheat the oven to 425 F or 220 C. Line a baking tray with parchment paper.
2. In a large bowl, rub the butter into the flour until the mixture resembles breadcrumbs. Stir in the baking powder and the cheese.
3. In a separate bowl or large measuring glass, beat together the buttermilk, egg and mustard with a pinch of salt. Next, make a well in the centre of the flour mixture and use a knife to stir all the ingredients together to make a soft dough.
4. Tip out the dough and lightly knead it on a floured board and then roll it out to a 2.5 cm thickness. Stamp out rounds using a 5 cm cutter (a water glass works well for this if you don't have a cutter) and transfer the scones to the baking tray. Brush the tops with milk.
5. Bake in oven for about 15 minutes until well risen and golden. Cool until warm on a wire rack. Serve with butter and a little extra grated cheese.
Our scones turned out a little more dense than we would have liked, so we've looked up some suggestions for how to improve on this. To make light, airy scones you must avoid over-beating the dough when you combine the wet and dry and do not over-knead on the floured surface (this is where we probably went wrong). The dough should be rolled to high thickness before cut into circles, for lighter scones. Finally, when cutting the scones out, do not twist the cutter or the scones may not rise evenly.
This photo captures why our scones turned out too dense - over-kneading. |
Tea in the garden |
We served our scones with darjeeling tea. I bought the tea leaves at the Borough Market in London from a man who taught me the proper way to brew and serve tea - I probably should have taken notes, because I don't remember all the details. Darjeeling is a light and thin-bodied tea, and therefore perfect for afternoon tea.
Happy Tea Time!
Caroline and Jo
Tuesday, July 10, 2012
Berry Buttermilk Muffins
A staycation is, as defined by Merriam-Webster, "a vacation spent at home or nearby". This term was added to the Merriam-Wesbter dictionary in 2009, as staycations have become ever more popular in recent years, what with a world financial crisis, rising gas prices, and all that other annoying stuff. Well, dear readers, why not plan a weekend that involves your very own austerity measures, i.e. your summer staycation? And what better way to start your staycation than with Staycation Muffins? These Buttermilk Berry Muffins take advantage of seasonal berries, are quick to make and the perfect treat for your very own stay-at-home vacation.
Just because you don't go away doesn't mean there aren't lots of things to do. Depending on where you live, you may be able to find some local festivals or events on in your city, and these are an excellent way to spend part of your staycation. For example, it is the 200th anniversary of the War of 1812, which means here in Ontario there are lots of events going on to commemorate this bicentennial (see here). In addition to any events in your city, you could also go to a local farmer's market - where you can browse seasonal produce and pick up some summer berries for your muffins! I've found that in Toronto lots of farmers markets have been popping up recently, so as long as you know the day and location, you can stock up on lots of good food for your staycation. It's also important to fit in some rest and relaxation - so get the hard part of your staycation over with first (and no, these muffins are not difficult to make) and start your vacation in the kitchen.
1 cup buttermilk
1/2 cup canola oil
2 1/2 cups all-purpose flour
3/4 cup granulated sugar
2 tsp baking powder
1/2 tsp baking soda
1/4 tsp salt
1 tsp lemon zest
1 1/2 to 2 cups berries (blueberries, raspberries, blackberries, etc - fresh or frozen)
1. Preheat oven to 375 degrees F and line muffin tray with paper liners.
2. In a large measuring cup or bowl, whisk together the egg, buttermilk, oil and vanilla extract.
3. In a large bowl, combine the flour, sugar, baking powder, baking soda, salt and lemon zest. Stir these dry ingredients together, and then gently fold in the berries. If using frozen berries, do not thaw first.
4. Pour in the wet ingredients and then gently stir only until ingredients are combined. Do not over-mix.
5. Fill each muffin cup almost full with the batter. Bake for 20 to 25 minutes, or until a toothpick inserted in the centre of a muffin comes out clean. Transfer to a wire rack and let cool 5 to 10 minutes before removing from pan to cool completely. Makes 12 muffins.
These muffins are perfect for a holiday because they are quite a treat. When baking them, I debated using some whole wheat flour instead of the entire amount of all-purpose flour, but I was happy with the result. The muffins are light and almost cake-like (thanks to the buttermilk no doubt). I used 1 cup of blueberries and 1 cup of raspberries. The raspberries weren't actually very sweet, but they go lovely in the lemony-sweet muffin.
If you do not have buttermilk on hand - don't worry, (the number one rule of staycationing should be not to worry) - you can easily make your own buttermilk. Simply add 1 tablespoon of vinegar or lemon juice to a cup of milk, and allow the milk to sit for about 10 to 15 minutes before adding it into the recipe. It won't be quite as smooth as store-bought buttermilk, but provides the right taste and texture for your muffins.
Now, back to your staycation. I'm crossing my fingers that you have a sunny day. Once the muffins have a cooled a bit from the oven, you can take them out to your backyard or a park with your book and your new playlist, and enjoy the fact that it's summer and you're on staycation!
If the opportunity arises where you are invited away to a cottage for the weekend or the beach for a day, by all means go and take the Staycation Muffins with you - I can guarantee they will be just as good away from home as they will be enjoyed at home on your staycation!
Happy Eating!
Caroline
Wednesday, July 4, 2012
Strawberry Mousse
Happy July, dear readers! It's still strawberry season here in Ontario (I can only imagine that you, like me, are thinking 'thank goodness!' to this statement) which means that finally here is my first strawberry-themed post!
When a friend came over last night to sample some of the object of this post, strawberry mousse, her response after the first bite was that mousse is an underrated dessert. I have to agree with her. Two of my other friends who I spoke to about making this mousse both gave rather surprised reactions. I can think of examples of chocolate mousse cakes that I've chosen to pass on because I assumed they would be too rich or too heavy - but strawberry mousse is in a different category. This is a refreshing and delicious way to end your meal on a hot summer night.
This is what I consider an ideal summer recipe. Not only does it use fresh seasonal fruit, but it is also simple to make. Even with the best air conditioning, it still can sometimes feel a bit wrong to me to turn the oven to bake anything when it's so hot outside. This mousse is made on the stovetop and chilled in the fridge so it doesn't do too much to heat up your kitchen. The lemon flavour shines through, which contributes to its refreshing-for-summer appeal. It's also pretty to serve, you can get creative about what you serve it in (last summer I opted for martini glasses) - and garnish with a fresh strawberry or two!
The Recipe:
4 cups strawberries
6 tbsp cornstarch
1/2 to 2/3 cup sugar
1/2 cup fresh lemon juice
1 tsp grated lemon rind
1/2 pint heavy cream, OR 1 cup firm yogurt*
1. Wash strawberries, hull, and slice. When washing strawberries, just run them under the tap - there's no need to soak strawberries as they absorb water this way which will dilute the flavour. Place the 4 cups of sliced strawberries in a medium-sized saucepan. Cover and cook over medium heat for 6 to 8 minutes, stirring occasionally, until the strawberries look like soup. Transfer to a medium sized bowl and set aside.
2. Without washing it first, use the same saucepan for this step. Combine the cornstarch, sugar, and lemon juice in the pan, and whisk until uniform.
3. Pour the still-hot strawberry soup back into the lemon juice mixture, whisking constantly. Return the pan to the stove and cook over medium heat, stirring constantly until thick. This should take between 5 and 8 minutes - and feel free to sample the strawberry mixture at this time. If there is any bit of a residual cornstarch taste, continue to cook the strawberry mixture. Once thickened, remove from heat and stir in the lemon rind.
4. Transfer strawberry mixture back to the same bowl the strawberries had been in, and cool to room temperature.
5. Puree until smooth in a food processor or blender, and return to the bowl. Cover tightly and chill until cold.
6. Fold in the whipped cream or yogurt and serve garnished with a strawberry.
*Whipped cream vs. yogurt: I've made this mousse enough times that I've tried the various options. It is absolutely delicious with freshly whipped cream - however it is also much richer this way. I find that when I have made the whipped cream version, I only want to eat a few spoonfuls of this mousse before it becomes too much. When I first tried using yogurt, I used plain 0% fat yogurt - and the result reminded me rather of an extra delicious and fresh tasting strawberry yogurt - not quite a mousse. This time I tried Greek yogurt for the first time. Although the mousse wasn't quite as light as it would be with whipped cream, I found the balance of the thicker yogurt with the sweet strawberries to be delicious, and definitely not too rich. If you do opt for yogurt, make sure to stir the yogurt before adding it to the strawberry mixture to help give it an airy texture. Let me stress again though that all the options taste delicious - it just rather depends on how rich you want this dessert to be.
Although you could make this mousse any time of year, even with frozen strawberries in the winter, there is nothing more perfectly summery than sitting outside and enjoying a long summer evening with a good friend or two, and serving of strawberry mousse.
Happy Moussing!
Caroline
Subscribe to:
Posts (Atom)