Thursday, March 29, 2012

Blueberry Yogurt Muffins


Those of you out there who know me well may be aware that I am a bit indecisive from time to time... So when I decided to bake muffins the other day, it took a lot of rummaging through the cupboard and freezer and sifting through far too many recipes to make up my mind. The wonderful thing about muffins is there really are so many kinds you can make - and I debated between banana muffins, banana chocolate chip, banana crumb topping... until I came across the last container of frozen wild blueberries in our freezer. That set me searching for blueberry muffin recipes. I scanned through quite a few cake-y looking blueberry muffin recipes, but I was searching for something healthier. This recipe comes from Canadian Living, but I've made a few adaptations. As you may recall, my recipe for apple oat muffins also uses yogurt, and they are delicious. When I saw that this recipe used yogurt, combined with the orange, I was finally able to make a decision.

One important tip for making muffins: generally, you combine the dry ingredients in one bowl and then the wet in a separate bowl, and then pour the wet ingredients into the dry. When you add the two together, be careful not to over-mix - stir until just incorporated, and that's it! This will make your muffins lighter.

THE RECIPE:
1 cup all-purpose white flour
1 cup all-purpose whole wheat flour
3/4 cup granulated sugar
1 tbsp baking powder
1 tsp baking soda
1/2 tsp salt
1/2 tsp cinnamon
2 eggs
1 cup plain yogurt
1 tbsp grated orange rind
1/4 cup orange juice
1/4 cup vegetable oil
1 tsp vanilla extract
1 to 1 1/2 cups blueberries, fresh or frozen

1. In large bowl, sift together flours, sugar, baking powder, baking soda, salt and cinnamon.
2. In separate bowl, whisk together eggs, yogurt, orange rind, orange juice, vegetable oil and vanilla extract. Pour over dry ingredients. Sprinkle with blueberries. Stir until just incorporated.
3. Spoon into paper-lined or greased muffin cups, filling almost to top. Bake at 375 degree oven for 25 minutes, or until tops are golden. Let cool in pan on rack for 2 minutes. Transfer to rack and let cool completely.

To "zest" my orange for the orange rind, I used the small side of a grater, since I don't have a zester, and it worked just fine. If you also don't have a zester, make sure you do use a small grater setting, because you don't want the rind pieces to be too big. And if you do have a zester... you should probably lend it to me.


If using frozen blueberries, keep them frozen until the last minute. This will stop their colour from running.


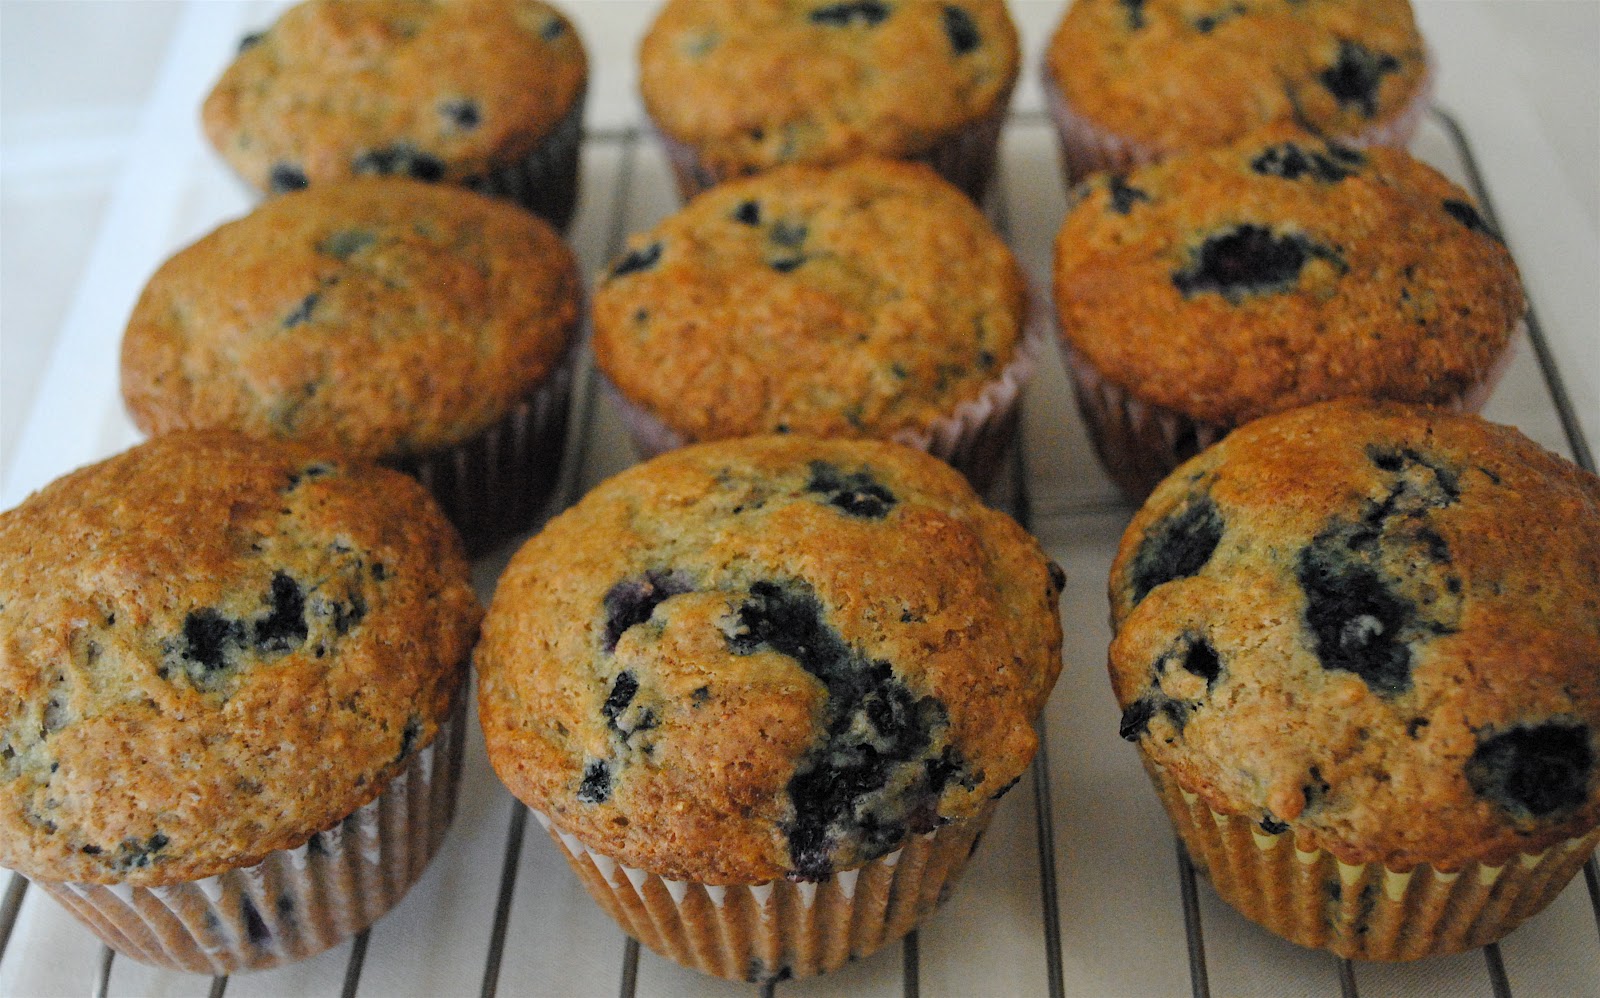
This recipe is quick and easy - unlike me when it comes to making a decision... So I won't tell you how long it took me to decide on making these muffins (because that's a bit embarrassing)... but I will tell you that I made the right decision. See for yourself.


Happy Muffin-Making!

Caroline

Thursday, March 22, 2012

Oatmeal Chocolate Chip Cookies


There's something to be said about oatmeal chocolate chip cookies. Actually I have a few somethings to say.

1 cup of chocolate chips = 1 mug
of chocolate chips...
First of all - why yes you could make oatmeal raisin cookies - but then they wouldn't have any chocolate in them! I've heard the bold statement before that anything that can be made with raisins would taste better with chocolate chips instead... and although I'm not about to test this theory on everything, with oatmeal cookies, I may have to agree...

Secondly, oatmeal chocolate chip cookies have more texture than regular chocolate chip cookies. I'm not trying to knock on chocolate chip cookies - but there's just something a little bit extra special about oatmeal in a cookie.

Another advantage to baking oatmeal cookies that I discovered while growing up: my dad really likes to make oatmeal, or porridge, for breakfast every morning in the winter. And growing up, I wasn't the biggest fan of porridge... so by using oats in cookies, I was really trying to use up all the oats so there wouldn't be any left for breakfast... well that never really worked out for me since we just bought more... But on the plus side, I do like porridge now - and I've become a bit of an expert on oatmeal cookies over the years too!

Finally - I don't know if it's just me, but whenever I bake oatmeal chocolate chip cookies, everyone seems to tell me that this is their favourite type of cookie. This recipe comes from my friend Kaili (who also provided me with the recipe for Mac and Cheese - I love when friends share their recipes with me!) It is a classic oatmeal chocolate chip cookie - just the right amount of chewiness, oats, and of course, chocolate chips!

The Recipe:

1 cup of butter, softened
1 cup brown sugar
1/2 cup white sugar
2 eggs
2 teaspoons vanilla extract
1 1/4 cups all-purpose flour
1/2 teaspoon baking soda
1/2 teaspoon salt
3 cups quick-cooking oats
1 cup semisweet chocolate chips

1. Preheat oven to 325 degrees and line cookie trays with parchment paper.
2. In large bowl, cream together butter and sugars until smooth. Beat in eggs one at a time, then stir in vanilla.
3. In a separate bowl, combine the flour, baking soda and salt. Stir flour mixture into creamed mixture until just blended.
4. Stir in the oats and chocolate chips.
5. Drop by heaping spoonful onto baking sheets.
The "Action" Shot
6. Bake for 12 minutes. Allow cookies to cool 5 minutes before transferring to a wire rack to cool completely.
Makes 3 1/2 to 4 dozen cookies (depending on size).


The question that may be crossing your minds now, dear readers, is what is the difference between these oatmeal chocolate chip cookies and Oh-So-Good cookies? Yes, oh-so-good cookies have Skor bits, which is undeniably delicious - but they have a much lower ratio of oats and therefore can't quite be called an oatmeal cookie. No questions about whether this recipe is in fact to make some very tasty oatmeal cookies.

One problem I've had time and time again with oatmeal cookies is that they will go flat. They may come out of the oven risen nicely - and within a few minutes of cooling, they've suddenly flattened to the tray. So how to avoid flat oatmeal cookies? Don't over-mix your dough once the eggs have been added in. As you'll see, some of our cookies turned out a bit flat - but I blame that on the mix master... and hey, at least flat cookies stack nicely!


These cookies are easy to make and such a classic... so what are you waiting for?

Happy Baking!

Caroline

Friday, March 16, 2012

St. Patrick's Day Cookies

Happy St. Patrick's Day!


Or... an excuse to wear green clothes, eat green food, drink green beer... and bake green cookies! (You wouldn't expect anything less from us here at scrambledeggsetc, now would you?) I used our favourite shortbread recipe and royal icing, which I dyed with green food paste in various shades.


To decorate, I outlined the cookies in one shade of green. Then I added a tiny bit more water to the icing, so it spread more easily, to "flood" the rest of the cookie. I spooned a bit on and then used a toothpick to help spread it to the border. And there you go - shamrock cookies for March 17!

Happy St. Patrick's Day!

Caroline

Wednesday, March 14, 2012

Poached Eggs and Hollandaise Sauce

Funny things names. When Caroline and I first started this blog we we pretty troubled at the concept of coming up with a name for it. I mean this was going to be (supposedly) what people would know the blog by, how they would search it, what we would call ourselves via charming tweets or Facebook status updates! Talk about pressure. Obviously we wanted it to be food related... but not something obvious/lame like In the Kitchen with Cousins, or Cooking with Caroline and Jo, we wanting something quirky and cute and memorable! We mulled over ideas for who knows how long and somehow came up with Scrambled Eggs Etc (I think it was actually taken off of an idea from a friend). Anyhow, as much as we like it, "Scrambled Eggs Etc" is pretty random - especially since we have yet to post any scrambled eggs recipes or even an egg recipe of any kind (save the somewhat obsessive egg pictures from baking sessions - but that's just not the same). Well readers, that changes TODAY! I present to you, Scrambled Eggs Etc's very first egg-centered recipe! (No it's not scrambled eggs...)

I give you POACHED EGGS! (on toast with avocado and hollandaise sauce!)

A sort of take on Eggs Florentine - minus the spinach and substitute with yummy ripe avocado! 
Poached Eggs always seem like a daunting task, and I'll admit that when you compare them to scrambled eggs, or fried eggs, or soft/hard boiled eggs it is true that they take a bit more time and a bit more patience. If you've ever attempted poached eggs before, perhaps like me you never really got past the instructions. Make a whirlpool in the boiling water? Add vinegar? Just for eggs? Hellls no... So perhaps, like me, you bought one of those little poached egg cups that you just slip in some boiling water (actually mine just came attached to a 1/2 the fat jar of Mayo). Not a bad substitute for the real thing - but I'll tell you right now, there is nothing more satisfying then poaching an egg to perfection (except maybe snapping a cell phone in half - but that is an entirely different and unrelated story).

So anyway, I urge you all to try it. Because it's not hard. And it's so rewarding - you'll feel like an instant cooking pro - master of the kitchen, chef extraordinaire, an eggcellent egg-maker?

WHAT YOU NEED:

Water
Eggs
White Vinegar? (I really don't think it's necessary - but I think it makes me feel more confidant so just give'r).

WHAT YOU DO:

1. Boil water so that its just a bit more than simmer. This way the eggs won't go all over the place from the water boiling too fast, or just spread out from no movement whatsoever.
2. Add a splash of white vinegar to the water.
3. WITHOUT making a whirlpool (honestly whoever came up with that is an idiot because it just makes everything go wrong), crack your eggs carefully into the boiling water. It might help to crack the egg into a little bowl first, then slipping it into the water.
4. Let it chill out for a bit - the egg whites will spread out a bit but for the most part they will actually stay put - especially once you take the egg out of the water!
5. Cook the egg for 3-5 minutes, then remove with a slotted spoon.

HOLLANDAISE SAUCE A LA TESSA BASTON:

Ingredients:
2 Egg Yolks
2 Tbsp Lemon Juice
Just under 1/2 cup melted, unsalted Butter
Salt & Pepper

Recipe:
1. Whisk the egg yolks until thickened, add lemon juice.
2. Melt butter in the microwave or on the stove (if melting it in a saucepan on the stove be careful it doesn't brown).
3. While continuing to whisk the eggs on the counter, add the hot butter SLOWLY and in a thin, steady stream. Don't stop whisking!
4. Place the bowl over a pot of gently boiling water, being careful not to let the bowl touch the water or the eggs will curdle.
5. Continuously whisk the eggs, adding salt and pepper to taste, until the sauce thickens to a nice consistency.

Perfect spontaneous Wednesday Brunch! 
After an unhappy opening shift at work, I went over to my friend Tessa's house with the intention of making something simple for breakfast (or in my case, second breakfast as I had already eaten on my break at 6am). Instead we were joined by my cousin Ali and our simple breakfast turned into a tasty, spontaneous brunch! Complete with tea and tulips.

Happy Eating!

Jo (and Tessa) (and Ali)

Monday, March 12, 2012

White Chocolate Macadamia Nut Cookies


Welcome to early March - an unpredictable time of year, where days can feel an awful lot like Spring. In case this beautiful weather isn't enough reason to be excited about March right now, lots of significant dates are coming up quickly, including Pi Day (also known as a good excuse to eat or bake a pie day) on March 14, the Ides of March on the 15th and... St Patrick's Day! As someone who grew up skiing for March breaks, it seems a little bit strange to me that I was able to be outside for most of Sunday with no jacket, no boots, no snow to worry about, etc. The topic of March break brings us to the subject of this post, since my cousin Britt, (who just so happens to be Jo's sister), was home last week for her March Break from Med School. We got together to... you guessed it, bake cookies! 

We made White Chocolate Macadamia Nut Cookies - which turned out to be a chewy soft cookie that wasn't overly sweet (sometimes I don't enjoy white chocolate macadamia nut cookies because they can be so sweet). I'd never bought Macadamia Nuts before, and Britt and I had to search a few different areas of Loblaws before we found this organic brand, Central Roast, on the baking aisle. (Remember the days when local grocery stores had bulk sections? I miss that...) Some facts about Macadamia Nuts that I bet you didn't know: they are native to Australia, and have been grown as a commercial crop in Hawaii since the 1920s. Also, they aren't very easy to find in a Toronto grocery store... 

THE RECIPE:
1 cup butter, at room temperature
3/4 cup brown sugar
1/2 cup white sugar
2 eggs
1 tsp vanilla extract
2 1/2 cups all-purpose flour
1 tsp baking soda
1/2 tsp salt
1 cup coarsely chopped macadamia nuts
1 cup white chocolate chips

1. Preheat oven to 350 degrees and line baking sheets with parchment paper.
2. In a large bowl, cream together butter and sugars until smooth. Beat in the eggs, one at a time, and then stir in the vanilla extract. 
3. In a separate bowl, combine the flour, baking soda and salt. Gradually add flour mixture into creamed mixture until all is incorporated. Stir in macadamia nuts and white chocolate chips.
4. Drop dough by teaspoon full onto cookie sheets. Press the cookie down with the back of a spoon as this will help the cookie spread a bit and bake more evenly.
5. Bake for 10 minutes, or until edges are golden brown. 


Well dear readers, it's time for a confession: Jo is the one who comes up with some of (okay, most of) our creative and amazing food photography ideas. Since Jo wasn't free to join us in the White Chocolate Macadamia Nut adventure, that put a lot of pressure on Britt to take over her sister's creative genius... We made these cookies on a beautiful day - and so Britt had the idea to take these cookies out into the wild... and voila! Why wouldn't cookies belong outside in your favourite Anthropologie mug on a beautiful spring day?

Happy Spring! Happy Eating!

Caroline and Britt

Thursday, March 8, 2012

Mac and Cheese

Scanning back through some of the most recent posts we've done, I've noticed a bit of a theme. We've made a lot of baked goods/desserts/sweet temptations... with a focus on chocolate (Chewy Chocolate Chip Brownies, Mini Chocolate Cupcakes, and Red Wine Chocolate Mini Cakes to name a few)... So it's about time for something savoury, right? This brings us to the age old debate of chocolate or cheese: if you had to give up one of the two for the rest of your life, which would it be? 


Not an easy question to answer, that's for sure.

In my fourth year at Queen's, my roommate Kaili and I developed a bit of an addiction to macaroni and cheese. I know what you're thinking - "How stereotypical, university students eating Kraft Dinner." But we weren't eating Kraft Dinner. We were eating President's Choice Extra Cheesy Macaroni and Cheese. This is a frozen mac and cheese that takes about an hour to bake but with no other real prep work necessary, it is still a pretty typical student dinner. It is creamy and cheesy and has a very nice bread crumb topping... but admittedly, isn't the healthiest dinner option.

Now that those days are behind us, however, we only have PC Mac and Cheese on very special occasions. Kaili has discovered a recipe for a homemade baked mac and cheese - which, dare I say it, is even more delicious than the President's Choice frozen one. She was kind enough to share this recipe with me, and we made it the other day and reminisced on all the times we've eaten macaroni together in the past...

THE RECIPE:
1 lb elbow macaroni

For the topping:
1 cup panko
2 tbsp parmesan cheese
1 clove of garlic
2 tbsp butter

For the sauce:
6 tbsp butter
1/4 cup flour
5 cups milk
3-5 cups shredded cheese (We used 1 cup parmesan and 4 cups old cheddar)
salt and pepper
1/4 tsp cayenne pepper

1. Cook the pasta al dente, as it will continue to cook in the oven.
2. While pasta is cooking, prepare the topping. Melt the butter in a small saucepan, and add the garlic glove, cut into medium sized pieces. (Spoiler alert: this will infuse the garlic flavour into the melted butter... delicious!)
3. Measure the panko into a medium sized bowl. Pour melted butter into the panko, while sifting out the garlic and discard garlic.
4. Mix in the 2 tbsp of parmesan cheese until incorporated. Set topping aside.
The topping
5. For the sauce: In a large pot on low, melt the 6 tbsp and then add the flour and whisk for approximately 3 minutes.
6. Add the milk 1 cup at a time, while continuously mixing. Once all the milk is added, turn heat to medium and whisk continuously for 10 minutes (this is the part where you get to really work your arm!) In this time, the sauce will thicken.
7. Bring the sauce to a boil and then immediately reduce to low heat and let simmer for 10 minutes. Whisk occasionally.
Can you see the bubbles? The sauce is boiling!
8. Remove saucepan from heat and slowly add in the cheese while stirring until completely melted. Do not keep the pot on the heat for adding the cheese, or the cheese will become stringy.
9. Add salt and pepper, to taste, and 1/4 tsp of cayenne pepper.
10. Add the cooked noodles to the sauce, and stir until completely covered.
11. Pour macaroni into baking pan and then completely cover the top with the panko mixture.
12. Bake for 15 minutes at 325 degrees. Then turn oven to a broil for one minute, to crisp the topping. Make sure to keep an eye on the macaroni while the oven is on broil, as if you leave it for too long it may quickly start to burn.
13. Serve and enjoy!


Panko note: When Kaili first told me about this recipe, I had to ask her what panko was, since I'd never cooked with it before. Panko is a flakier bread crumb that is traditionally used in Japanese cuisine. It should be available in most large grocery stores and I recommend using it over regular bread crumbs, as it really makes for a lighter topping. This topping is amazing with the garlic butter and parmesan mixed in.

Cheese note: We used cheddar as our base cheese and parmesan as our accent cheese - but there are definitely lots of other combinations you can use to create a delicious cheese sauce for this macaroni recipe.

Seconds, anyone?

I'm not going to try and answer whether I'd choose chocolate or cheese, if I had to give one up - because my answer changes depending on my mood... although right now, cheese seems to be winning, just a little bit...

Happy Eating!

Caroline

Tuesday, March 6, 2012

Red Wine Chocolate Mini Cakes

If there is one thing I love in life, it's red wine - after family and friends and all those things you are supposed to say first, that is. The point is it's up there on my list of favorite things... so when my birthday rolled around this past weekend it seemed like the perfect opportunity to test out a cake recipe I found a few months ago that damn near knocked my socks off! Red Wine Chocolate Cake. 

.......

Sorry, I was busy salivating at the title. Gets me every time. 

Anthropologie+Red Wine+Leopard Print Muffin Liners? Hells. Yes.

Now, if you'll recall - as I'm sure you do - for Caroline's birthday in January, we made some pretty fancy Red Velvet Cupcakes. Well readers, consider this cake the REAL Red Velvet of cakes. It's a dense little cake with a lot of flavour - the red wine doesn't all burn off in the oven, and the cinnamon/chocolate combo gives the cake a beautiful kick. Thought I forgot about the topping? NOPE! It's just as awesome. Think "glorified whipped cream"... a.k.a. whipped cream+mascarpone cheese... a.k.a. delicious.  

To give its due praise, this recipe hails from our go-to food blog Smitten Kitchen. The original recipe calls for making a cake. We nixed that in favor of making cupcakes - erm, mini-cakes (because it sounds fancier, plus these little darlings really do turn out more like miniature cakes than your standard cupcake). It also allowed us to use some sweet leopard print muffin liners Caroline so graciously gave me as a birthday gift! Double win. You know what ELSE she got me? An Anthropologie apron of my very own! 

Twin-sies!!
showing of "the goods"

Now I know we've gotten into the habit of saying this a lot - but this cake is actually very quick and easy to make! Who knew baking was such a breeze? But to give you an idea on just how easy we mean when we say easy (and we mean EASY), lets compare this blog recipe to ooohh I don't know - our 3 course Italian feast that took about 10 hours to complete...? Even with our dilly-dallying, wine drinking, and what I'll call other-peoples-blogs-bashing (more on that later), we finished baking, photographing and taste testing this cake in under 3 hours! Believe me that's kind of a miracle. I would stab a guess at saying if you were baking this cake solo, or with a non-blogging/obsessed with taking pictures friend, you could probably get it done in under an hour (baking time included!). That being said, let's get to it:

THE RECIPE:
6 tbsp unsalted butter, at room temperature
3/4 cup firmly packed dark brown sugar
1/4 cup granulated sugar
1 large egg + 1 egg yolk, at room temperature
3/4 red wine* (plus an extra splash or two)
1 tsp vanilla extract
1 cup + 1 tbsp all-purpose flour
1/3 cup Dutch cocoa powder
1/8 tsp baking soda
1/2 tsp baking powder
1/4 tsp table salt
1/4 tsp ground cinnamon

Come on, you knew this was coming right?
I just have a thing for playing with raw eggs...
that's not weird right?
1. Preheat oven to 325 and line bottom of a 9-inch round cake pan with parchment or spray with non-stick spray, or line muffin tins with muffin liners (in leopard print like ours, if you dare
2. In large bowl, cream the butter until smooth on medium speed. Add the sugars and beat until fluffy.
3. Add the egg and yolk and beat well, then add the red wine and vanilla. Don't worry if the batter is a little uneven, it will all work out in the end!
4. Sift the flour, cocoa, baking soda, baking powder, cinnamon and salt together, right over your wet ingredients. Mix until 3/4 combined, then fold the rest together with a rubber spatula.
5. Spread batter into prepared pan. Bake for about 25 minutes, or until a cake tester comes out clean. The top of the cake will be shiny.
6. Cool in pan for about 10 minutes than remove - if you use a 9" inch cake pan, flip the cake out of the pan and cool the rest of the way on a cooling rack. If you used a muffin tray, they may be a bit easier to get out to move to the cooling rack.


*We used Fuzion - since the wine is going into a cake, it's not really that important to use a really expensive wine... although it doesn't hurt if you enjoy the taste of the wine for when you're sipping on it while you bake. 

Red Wine made several appearance that afternoon. In the recipe, in our mouths, and as a measuring cup... I mean NAME me a better measuring device for wine than a wine glass?

Topping:
1/2 cup mascarpone cheese
1/2 cup chilled heavy or whipping cream
2 tbsp granulated sugar
1/4 tsp vanilla extract

1. Whip mascarpone, cream, sugar and vanilla together until soft peaks form. Dollop generously (emphasis on the generously) onto each slice of cake, or on top of each mini cake. The topping can be covered and refrigerated for up to 4 hours.

Sidenote: We left decorating - or rather "dolloping" until we were ready to serve the minicakes. The topping isn't like a frosting. You don't "ice" these wine-filled treats. The topping is best kept in an airtight container for storing and traveling until just before serving!

Minicakes all packed up and ready to go - who new an Anthropologie gift box could be so multi-purpose?


Happy Baking! Happy Eating! Happy (belated) Birthday to Me!

Jo