Tuesday, January 31, 2012

Blueberry Buttermilk Scones

It’s always good to try things outside of your comfort zone, right? Or switch up your routine and challenge yourself? If you haven’t noticed, dear readers, I like to bake cookies and muffins, and make soup… I like to bake and cook other food too, of course, but if we’re talking about leaving my comfort zone, that brings us to scones.

I think scones have a bad rep in my mind because of a few bad ones I’ve had over the years. Sometimes scones can be too dry or flavourless. When I decided to take on the challenge of scones, therefore, I made sure to pick ones packed with flavour. Luckily, these scones also turned out to be soft and light, and not dry.

I’ve used Martha Stewart’s recipe for blueberry buttermilk scones but I made my own addition of lemon zest. I love the combination of lemon and blueberry – tart and sweet. I made mini scones, which are the perfect size to have with a cup of tea. If you don’t have a daily teatime scheduled in your life, now is definitely the time to start. I recently rediscovered George Orwell’s essay, “A Nice Cup of Tea” which I highly recommend reading. Orwell provides instructions on how to make the perfect cup of tea – and I agree with his point that tea should be drunk without sugar. 

As you may have guessed, dear readers, when you read about Red Velvet Cupcakes, it was recently my birthday. Jo gave me the perfect birthday present from my favourite store: Milk Bottle Measuring Cups  from Anthropologie. They stack to form an adorable milk bottle – and when you take them apart to use as measuring cups, each one is a different colour on the inside. I obviously had a lot of fun taking pictures with my new measuring cups while I made these scones!


The Recipe:

1 1/2 cups all-purpose flour
1/2 cup cake flour, (not self-rising)
3 tablespoons granulated sugar
2 1/2 teaspoons baking powder
3/4 teaspoon salt
1/2 cup (4 ounces) cold unsalted butter, cut into small pieces
1 cup (1/2 pint) blueberries
1/2 cup low-fat buttermilk
1 large egg, plus 1 large egg lightly beaten for egg wash
1/2 teaspoon pure vanilla extract
Zest of one lemon
Fine sugar, for sprinkling

The texture of the flour and sugar, etc mixed with the butter
1. Preheat oven to 375 degrees. Since I made mini scones and worried they may burn on the tops before baking through at the temperature the original recipe called for, I reduced my oven to 365 degrees.
2. Whisk together flours, granulated sugar, baking powder, and salt in a large bowl. Cut in butter with a pastry cutter, or rub in with your fingers, until mixture has the texture of coarse meal. It is important that you use cold butter rather than room temperature butter as this will help prevent the scones from spreading too much while baking. Stir in blueberries.
3. Whisk together buttermilk, 1 egg, the lemon zest, and the vanilla. Drizzle over flour mixture, and stir lightly with a fork until dough comes together but a small amount of flour remains in bowl.
4. Turn out dough onto a lightly floured work surface, and gently knead dough once or twice just to incorporate flour.
5. Create a 1-inch thick rectangle which should be about 12” x 6”. Cut into strips, and then cut each strip into small triangles.

Cut the dough into strips and then triangles
6. Transfer to parchment paper lined baking sheet. You definitely want to make sure you line your trays, because the blueberries will bleed a bit as they bake – and that wouldn’t be fun to clean off your tray after!
7. Brush scones with egg wash (the lightly beaten egg), and sprinkle with sanding sugar.
8. Bake until golden brown and cooked through, about 18-20 minutes. Transfer scones to wire racks to cool. Makes about 30 mini scones, or 12 regular sized scones.


Baking scones may not have been the most daring new endeavour I could have taken on – but I’m quite pleased with the results. And you will be too, I promise!

Happy Eating!

Caroline
The measuring cups stack to make a Milk Jug!

Saturday, January 28, 2012

Leek and Butternut Squash Soup

January is (somehow) almost over – which means that by now, it wouldn’t be that surprising if one had maybe started break a New Year’s resolution. What? You think I may have broken mine? That’s hardly possible… I love soup! 


As I discussed when I made Chickpea and Tomato Soup, my New Year’s Resolution is to eat more homemade soup. I’ve definitely had lots of soup in the past few weeks – and yes, some of it has even been homemade!

I was skiing in Quebec at Mont Tremblant in the first week of January. After many winters of skiing in Quebec, I speak quite confidently when I say that food in Quebec is delicious. I know, dear readers, that you are probably dying for a recipe for the delicious cheese fondue I had while there, but instead I decided to post in theme with my New Year’s resolution.

At a lovely restaurant in the village of Mont Tremblant (i.e. not the Intrawest village but the real town), La Petite Cache, I tried the Leek and Butternut Squash soup. I have a very soft spot for Butternut Squash soup. It’s a fact that my grandmother makes the best Butternut Squash soup ever. Since unfortunately I have yet to receive that recipe from her, I decided to experiment with trying my own version of Leek and Butternut Squash. The soup at La Petit Cache was served garnished with diced pears, shaved parmesan, and greens – which was delicious, but I also found the flavours of the garnish over-powered the basic ingredients of the soup: the leek and the squash. For my version, I went with a much simpler garnish: a dollop of sour cream!

So, if you’re not heading to Mont Tremblant to try the soup at La Petit Cache, here is how you can make your own:

(And if you do decide to plan a trip to Mont Tremblant, take me with you!)

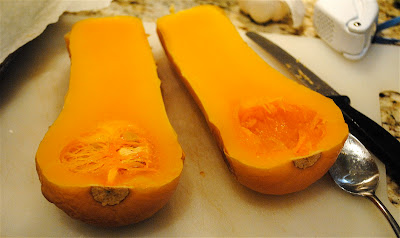
Butternut Squash - for some reason, I always think acorn (little,
green) squash are butternut - but these are the real deal!
The Recipe:

2 Tbsp olive oil

1 clove garlic, minced

3 stalks of leek
2 small butternut squash
2-3 small potatoes
6 cups vegetable stock
Black pepper

Sour cream, optional

1. Roast the butternut squash. Prick the squash with a fork on each side and place on a parchment paper lined baking sheet. Bake at 350 for 45 minutes to an hour. The squash will be ready when you can easily slide a fork into it.
2. Peel the potatoes and dice into small cubes. Partially cook the potatoes in a small pot of boiling water, so they are still firm.
3. Cut off the white ends of the leek and dice into small pieces. I know it seems like you’re only using a very small portion of the leek, since you’ll be discarding the long green stalks, but the white ends are the tender and flavourful part of the leek that is generally used in cooking.
4. Heat oil in a large pot or stockpot. Add the leeks and minced garlic and sauté for about 2-4 minutes, until the leeks are translucent but not brown.
5. Once the squash has baked, cut it open and remove the seeds. Peel and dice the squash into one-inch squares.
6. Add the potatoes into the leeks and sauté for about a minute. Next, add the squash and sauté for another minute.
7. Add the vegetable stock. If there is not enough liquid, add water (this will make the soup less thick in the long run).
8. Bring the soup to a boil and then reduce heat to medium and cook for at least half an hour. I let the soup cook for about 2 hours.
9. Allow soup to cool. Puree the soup in batches in a blender or food processor.
10. Serve with coarsely ground black pepper and sour cream if desired.

Diced potato, garlic and leek - lots of flavour!

The combination of leek and butternut squash may seem a bit surprising, but the leeks add a strong flavour that complements the squash well. It is important to roast the butternut squash first, as this brings out a lot more flavour than if you simply cut it up and cook it in the soup broth.

The seeds of the butternut squash are easy to scoop out once roasted and cooled

An important note that I learned about my “foolproof” plan of taking soup for lunch (as discussed in Chickpea and Tomato Soup). If the soup is frozen, it’s not really best to let it defrost in your lunch bag (or whatever you take your lunch to work or school in) until it’s time to eat – it will start to separate as it defrosts and can potentially spill… not that this may have happened to me… Next time, I think I’ll defrost the soup before I pack it – and make sure it’s in a well-sealed container…


Happy Soup Eating!

Caroline

Tuesday, January 24, 2012

Red Velvet Cupcakes

Dear Readers, let me ask you an important question: if it was your birthday, and you could have any type of cupcake, what would you choose? I think the answer here is pretty rhetorical… and if you were thinking something other than Red Velvet, maybe this post isn’t for you…

There are three things you need to know about Red Velvet cake:
1. It is tasty
2. It is pretty
3. It comes with Cream Cheese Icing (read: TASTY)

Could you ask for anything more in a cake?

When we at scrambledeggsetc had the brilliant idea of baking some Red Velvet cupcakes for Caroline's birthday we knew only the best would do. Enter: Martha Stewart.


THE RECIPE(s):


Red Velvet Cupcakes

2 1/2 cups cake flour (not self-rising), sifted
2 tablespoons unsweetened Dutch-process cocoa powder (we used regular cocoa powder and it worked fiiiine), silly Martha and her fancy pants cocoa. 
1 teaspoon salt
1 1/2 cups sugar
1 1/2 cups vegetable oil
2 large eggs at room temperature (question: is there REALLY a difference between a regular egg and a large egg? what about EXTRA large eggs? do they come from extra large chickens? do they actually make a difference in your cake???? if someone has the answers to these questions please enlighten us). 
1/2 teaspoon red food gel/paste*
1 teaspoon vanilla extract 
1 cup buttermilk
1 1/2 teaspoons baking soda
2 teaspoons white vinegar (Martha uses "distilled" vinegar, I don't know why, nor do I care). 

1. Preheat oven to 350 degrees. Line standard muffin tins with paper liners.
2. Sift cake flour, cocoa and salt together into a large bowl and whisk until incorporated.
3. In a separate bowl or stand mixer, whisk together sugar and oil until combined on medium-high speed. Add eggs, one at a time, beating until each is incorporated, scraping down sides of bowl as needed. Mix in food colour and vanilla.
*Martha, in all her baking glory, insists that you are better off using a red food gel or paste instead of your standard grocery store food coloring. [If you DO use regular food coloring you have to dump at least a whole bottle of it into your batter - thats a whole lot of stuff-i-don't-know-what-food-coloring-is-actually-made-of going into your cake. Meanwhile, you only need 1/2 a teaspoon of food gel). 

It's also a fantastic excuse to make a trip to William Sonoma! (Ohh what a shame). Caroline picked up a set of William Sonoma’s “Food Paste Set, Vivid Color” for $22, where she chatted with the sales associate about our plans to bake Red Velvet cupcakes. She told Caroline that this food paste was perfect for Red Velvet (or Blue Velvet) as well as icing for decorating cakes and cookies. Martha's insistence AND William Sonoma's approval? Needless to say we have definitely jumped on the food gel bandwagon. 

*ahem* now where were we?

Caroline demonstrates: the Fun Part!
Look at how much fun she is having...
4. Reduce speed to low. Add flour mixture in three batches, alternating with two additions of buttermilk, and whisking well after each.
5. And now the fun part: in a small bowl, stir together the baking soda and vinegar – and it will foam! (Just like grade 3 science class?)
6. Add mixture to the batter, and mix on medium speed for about 10 seconds.
7. Spoon batter into lined cups, filling each three-quarters full. We find an ice cream scoop works well for this.
8. Bake, rotating tins halfway through, until a cake tester (or toothpick if you don’t have a cake tester, like us) inserted in centers comes out clean, about 20 minutes.
9. Transfer tins to wire racks to cool completely before removing cupcakes. Cupcakes can be stored overnight at room temperature, or frozen up to 2 months, in airtight containers.
10. To finish, use a small offset spatula (or a knife or whatever you find easiest to work with) to spread cupcakes with cream cheese frosting.

Cream Cheese Frosting...

1 cup (8 ounces) unsalted butter, 
room temperature
12 ounces cream cheese, room temperature (a standard package of Philadelphia Cream Cheese is 8 ounces, so you’ll need one and a half packages)
4 cups icing sugar, sifted
3/4 teaspoon pure vanilla extract
1. Beat butter and cream cheese with a mixer on medium-high speed until fluffy, 2 to 3 minutes.
2. Reduce speed to low. Add sugar, 1 cup at a time, and then vanilla; mix until smooth.

And now for some Red Velvet Cupcake "Words of Wisdom"...


Unlike cooking, where you can experiment with measurements and ingredients etc... baking is very precise. This is perhaps especially true for this recipe, which is slightly more complicated than your standard cake (with all the baking soda/vinegar-ness and what not). 

On a completely opposite note, we did find that the cupcakes were a little bit oily. Not taste-wise (they were delicious, as if you needed to know), but the bottoms of the cupcake tins and liners were a little wet - solution: add less oil next time! 

Remember to add the sugar to the oil and NOT to the other dry ingredients. Not that we made this mistake or anything... and had to start all over again... no, no, we scrambledeggsetc bloggers are PERFECT.

If your cocoa powder is a bit lumpy take a second to sift it. We didn't thinking it would be fine once we whisked everything together. Alas, we ended up with funny brown spots on our cupcakes (not that you could see them once they were frosted, and it didn't seem to change the taste... but still). 

Finally, remember that when you add the food gel to the mixture, it hasn't been mixed with the cocoa powder yet, and that the cocoa powder will alter the hue of the red. A.K.A if you can't seem to get that perfect, rich Red Velvet color wait until you've added the cocoa. You can always add more gel afterwards. 

Oh.. and if you are planning on taking some picture of your cupcake (and honestly, they are so absolutely gorgeous why wouldn't you?), make sure you come up with some artsy *cough*awesome*cough* display for them. A piano is totally a natural spot to find cupcakes right?...

Happy Baking :) 

Caroline and Jo 


Saturday, January 14, 2012

Oh-So-Good Cookies


Oh-So-Good Cookies became a Friday the 13th tradition one year when I was in high school when there seemed to be an abnormally high amount of Friday the 13ths. Baking cookies may not be your expected Friday the 13th tradition – but I’ve never been one for horror movies… speaking of which, will someone please explain what’s up with the hockey mask that Jason wears in the Friday the 13th movie?

This recipe comes from my friend Kelcie, as we used to bake these cookies together on Friday the 13th and then not watch a scary movie. Unfortunately I lost my original copy of the recipe that she gave me, but Google came to my rescue – apparently others out there are aware of the Oh-So-Good cookie and all its deliciousness! Oh-So-Good Cookies are a chocolate chip cookie with oats and Skor bits. As the ratio of oats is lower than in your average oatmeal cookie, I would not quite call them an oatmeal chocolate chip cookie. Kelcie and I adapted the original recipe, by removing the called for nuts and raisins, and instead we added in a variety of chocolate chips (it was really whatever we found in the cupboard – white chocolate chips, milk chocolate chips, butterscotch chips, etc). Today, I’ve made them with semi-sweet chocolate chips and Skor bits.

I realize that today is January 14 – and it would have been more fitting to post this yesterday, but now I can successfully confirm that Friday the 13th was not an unlucky day. Did you know that a fear of Friday the 13th is called either friggatriskaidekaphobia (Friday is named after the Norse goddess Frigga while triskaidekaphobia is the fear of the number thirteen) or the Greek paraskevidekatriaphobia, which comes from Paraskeví (Friday) and dekatreís (Thirteen)? Now, dear readers, you’re all set to wow your friends with these big words AND a batch of cookies on the next Friday the 13th, which happens to be only a few months off, in April… 

THE RECIPE:

1/2 cup brown sugar
1/2 cup butter
1/4 cup granulated sugar
1 egg
1 tsp vanilla
1 cup flour
1/2 tsp baking soda
1/4 tsp salt
1 cup oats
1 cup semi-sweet chocolate chips
1/2-3/4 cup Skor bits

1. Preheat oven to 375 and line cookie trays with parchment paper.
2. Cream together the butter and sugars. Once well blended, beat in the egg and vanilla. 
3. Add flour, baking soda and salt and mix until the dry ingredients are fully blended in. 
4. Stir in oats, chocolate chips and Skor bits. 
5. Drop dough by rounded teaspoon onto cookie trays, leaving a bit of room for the cookies to spread. Bake 8 to 10 minutes, or until edges are just golden brown. Makes 3 dozen cookies.


Dear readers, I am going to tell you an oh-so-important secret about baking. Skor bits are meant to be baked into oatmeal cookies. I believe this is a secret, because if you read the back of the package of a bag of Chipits Skor bits, there is a recipe for “Chipits Toffee Crunch Blondies”. Although I’m sure these are delicious, I am not quite sure why there is no recipe for oatmeal chocolate chip plus Skor bits. The combination of oatmeal and Skor is unbeatable… I’m actually not sure why anyone would ever bake oatmeal chocolate chip cookies without Skor bits. 

Adding in the Skor bits... you can never have too many!

I have to admit, dear readers, that I was quite excited to bake something other than shortbread. Don't get me wrong, shortbread toblerone are my favourite cookies - but this holiday season, after making 5 batches to share with friends and family, I was ready to bake something different. These Oh-So-Good cookies are aptly named - try them to find out for yourself - and I don't think there's any need to wait for the next Friday the 13th to bake a batch! 


Happy Eating!

Caroline